> ## Documentation Index
> Fetch the complete documentation index at: https://reown-5552f0bb-devin-1759771246-appkit-1-8-9-docs.mintlify.site/llms.txt
> Use this file to discover all available pages before exploring further.
# How to integrate Smart Sessions with React
Learn how to use Reown AppKit with Smart Sessions to grant permission to delegate actions for a specific period of time.
## Prerequisites
* A fundamental understanding of JavaScript and React.
* A minimal installation of AppKit in React.
* A new project Id obtained from Reown Dashboard at [https://dashboard.reown.com](https://dashboard.reown.com)
* A wallet with the private key in order to sign Transactions
## Final Project
Below is the complete working example that demonstrates how Smart Sessions work with AppKit.
Clone this Github repository and follow the readme to try it out locally.
## AppKit Minimal Installation
You can start a small project following the guidelines from our [installation React docs](https://docs.reown.com/appkit/react/core/installation#wagmi)
## Explain the functionality
In this guide, we're going to build the front end of a dApp and a server to sign transactions on behalf of the user.
### Front-end
* The user will connect to AppKit's smart wallet using their email, and then grant permission to the server-linked wallet to execute actions on their behalf.
* Refer to the configuration file found in `src/config/configSmartSession.ts`.
### API Server
The API server can have two endpoints:
1. getPublicKey: Returns the publicKey for the keypair that is going to execute the different function in from the server. In order to achieve this, a private key needs to be added to the .env file.
2. executeFunction: Triggers the function and checking the execution.
* Refer to the server configuration file found in `config/index.ts`
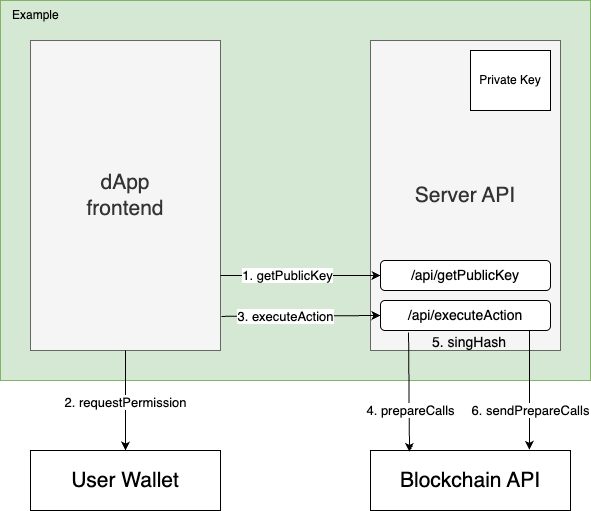 1. Frontend calls the endpoint `getPublicKey`.
2. The `requestPermission` modal appears for the user to approve using their wallet.
3. In this example, the action is executed by calling the server API (though there are several ways to perform this action).
4. `prepareCalls` makes an RPC call to the Blockchain API.
5. The server signs the hash with the private key.
6. `sendPrepareCalls` makes an RPC call to the Blockchain API.
In order to simplify the code, it is recommended that you use the util file from the server; which can be found here - `util/prepareCalls.js`. All the RPC calls are performed to `https://rpc.walletconnect.org/v1/wallet?projectId=`.
## Start building
### Part 1 | Grant Permission
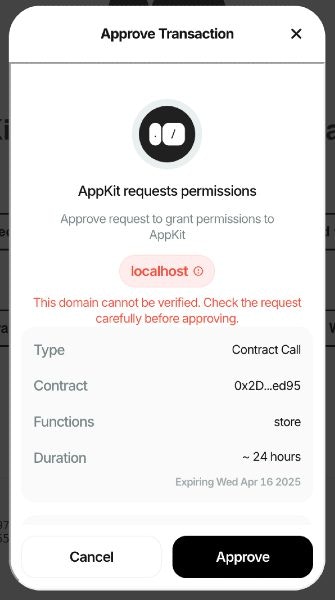
The user will approve a `grantPermissions` request, to allow an explicit address to execute specific calls.
1. Start by installing the library that contains the smart session feature in early access:
```bash npm theme={null}
npm install @reown/appkit-experimental
```
```bash Yarn theme={null}
yarn add @reown/appkit-experimental
```
```bash Bun theme={null}
bun add @reown/appkit-experimental
```
```bash pnpm theme={null}
pnpm add @reown/appkit-experimental
```
2. We import the grantPermissions function from the package
```js theme={null}
import { grantPermissions } from '@reown/appkit-experimental/smart-session'
```
3. Complete the correct configuration for the file `src/config/configSmartSession.ts`.
4. Call the getPublicKey API endpoint to retrieve the public key.
```js theme={null}
const response = await fetch(`${apiURL}/api/signer`);
const { publicKey: dAppECDSAPublicKey } = await response.json();
```
5. Decide which permission to allow the server to do for the user:
```js theme={null}
const dataForRequest = {
dAppECDSAPublicKey: publickey as `0x${string}`, // public key from the server address
chainId: Number(chainId), // chain Id
contractAddress: storageSC as `0x${string}`, // address of the smart contract
abi: storageABI, // the ABI of the smart contract
functionName: "store", // the function we allow the server to execute
expiry: Math.floor(Date.now() / 1000) + 24 * 60 * 60, // The duration for which the permission is granted. (24hs)
userAddress: address as `0x${string}`, // Default actual address
};
```
6. Call the `generateRequest` function and use its information to invoke grantPermission, prompting the user for wallet approval of the action.
```js theme={null}
const generateRequest = (dataForRequest) => {
const request: SmartSessionGrantPermissionsRequest = {
expiry: dataForRequest.expiry,
chainId: toHex(dataForRequest.chainId),
address: dataForRequest.userAddress as `0x${string}`,
signer: {
type: 'keys',
data: {
keys :[{
type: 'secp256k1',
publicKey: dataForRequest.dAppECDSAPublicKey
}]
}
},
permissions: [ {
type: 'contract-call',
data: {
address: dataForRequest.contractAddress,
abi: dataForRequest.abi,
functions: [ {
functionName: dataForRequest.functionName
} ]
}
}],
policies: []
}
return request;
}
// Grant permissions for smart session
// This step requests permission from the user's wallet to allow the dApp to make contract calls on their behalf
// Once approved, these permissions will be used to create a smart session on the backend
const approvedPermissions = await grantPermissions(request);
```
7. The user must log in with their email in a special way. If the email is `test@gmail.com`. Change it to `test+smart-sessions@gmail.com` to enable smart session support.
8. After approving the grant permission, the server can interact in their behalf.
1. Frontend calls the endpoint `getPublicKey`.
2. The `requestPermission` modal appears for the user to approve using their wallet.
3. In this example, the action is executed by calling the server API (though there are several ways to perform this action).
4. `prepareCalls` makes an RPC call to the Blockchain API.
5. The server signs the hash with the private key.
6. `sendPrepareCalls` makes an RPC call to the Blockchain API.
In order to simplify the code, it is recommended that you use the util file from the server; which can be found here - `util/prepareCalls.js`. All the RPC calls are performed to `https://rpc.walletconnect.org/v1/wallet?projectId=`.
## Start building
### Part 1 | Grant Permission
The user will approve a `grantPermissions` request, to allow an explicit address to execute specific calls.
1. Start by installing the library that contains the smart session feature in early access:
```bash npm theme={null}
npm install @reown/appkit-experimental
```
```bash Yarn theme={null}
yarn add @reown/appkit-experimental
```
```bash Bun theme={null}
bun add @reown/appkit-experimental
```
```bash pnpm theme={null}
pnpm add @reown/appkit-experimental
```
2. We import the grantPermissions function from the package
```js theme={null}
import { grantPermissions } from '@reown/appkit-experimental/smart-session'
```
3. Complete the correct configuration for the file `src/config/configSmartSession.ts`.
4. Call the getPublicKey API endpoint to retrieve the public key.
```js theme={null}
const response = await fetch(`${apiURL}/api/signer`);
const { publicKey: dAppECDSAPublicKey } = await response.json();
```
5. Decide which permission to allow the server to do for the user:
```js theme={null}
const dataForRequest = {
dAppECDSAPublicKey: publickey as `0x${string}`, // public key from the server address
chainId: Number(chainId), // chain Id
contractAddress: storageSC as `0x${string}`, // address of the smart contract
abi: storageABI, // the ABI of the smart contract
functionName: "store", // the function we allow the server to execute
expiry: Math.floor(Date.now() / 1000) + 24 * 60 * 60, // The duration for which the permission is granted. (24hs)
userAddress: address as `0x${string}`, // Default actual address
};
```
6. Call the `generateRequest` function and use its information to invoke grantPermission, prompting the user for wallet approval of the action.
```js theme={null}
const generateRequest = (dataForRequest) => {
const request: SmartSessionGrantPermissionsRequest = {
expiry: dataForRequest.expiry,
chainId: toHex(dataForRequest.chainId),
address: dataForRequest.userAddress as `0x${string}`,
signer: {
type: 'keys',
data: {
keys :[{
type: 'secp256k1',
publicKey: dataForRequest.dAppECDSAPublicKey
}]
}
},
permissions: [ {
type: 'contract-call',
data: {
address: dataForRequest.contractAddress,
abi: dataForRequest.abi,
functions: [ {
functionName: dataForRequest.functionName
} ]
}
}],
policies: []
}
return request;
}
// Grant permissions for smart session
// This step requests permission from the user's wallet to allow the dApp to make contract calls on their behalf
// Once approved, these permissions will be used to create a smart session on the backend
const approvedPermissions = await grantPermissions(request);
```
7. The user must log in with their email in a special way. If the email is `test@gmail.com`. Change it to `test+smart-sessions@gmail.com` to enable smart session support.
8. After approving the grant permission, the server can interact in their behalf.
 ### Part 2 | Execute the action
1. The server makes the call `wallet_prepareCalls`.
```js theme={null}
// make the prepare calls in our example
// arg -> is the array of arguments to call the contract
const response = await makePrepareCalls(userAddress, chainId, contractAddress, ABI, functionName, context, arg);
```
2. The Result of the call should be signed with the private key.
```js theme={null}
// Use the private key to sign the hash
const signature = await signatureCall(APPLICATION_PRIVATE_KEY, response.signatureRequest.hash);
```
3. Then we send the `wallet_sendPreparedCalls` with that signature.
```js theme={null}
// send the prepared calls
const sendPreparedCallsResponse = await sendPreparedCalls({
context: response.context,
preparedCalls: response.preparedCalls,
signature: signature,
});
```
4. The server can make several calls to `wallet_getCallsStatus` to check when it's confirmed.
```js theme={null}
const userOpIdentifier = sendPreparedCallsResponse[0];
// function from our example to call wallet_getCallsStatus
const response = await getCallsStatus(userOpHash);
if (response.status === "CONFIRMED") { // check when the tx is confirmed
return response;
}
```
## Common Known Issues
* "The method `wallet_grantPermissions` does not exist / is not available.’
* Please double check that your are using the right email adding +smart-sessions to end. Example: [test@gmail.com](mailto:test@gmail.com) -> [test+smart-sessions@gmail.com](mailto:test+smart-sessions@gmail.com)
* Don't forget to add funds to the smart wallet.
* Ethereum Sepolia isn’t currently working with Smart Sessions. Use Base Sepolia instead for now.
### Part 2 | Execute the action
1. The server makes the call `wallet_prepareCalls`.
```js theme={null}
// make the prepare calls in our example
// arg -> is the array of arguments to call the contract
const response = await makePrepareCalls(userAddress, chainId, contractAddress, ABI, functionName, context, arg);
```
2. The Result of the call should be signed with the private key.
```js theme={null}
// Use the private key to sign the hash
const signature = await signatureCall(APPLICATION_PRIVATE_KEY, response.signatureRequest.hash);
```
3. Then we send the `wallet_sendPreparedCalls` with that signature.
```js theme={null}
// send the prepared calls
const sendPreparedCallsResponse = await sendPreparedCalls({
context: response.context,
preparedCalls: response.preparedCalls,
signature: signature,
});
```
4. The server can make several calls to `wallet_getCallsStatus` to check when it's confirmed.
```js theme={null}
const userOpIdentifier = sendPreparedCallsResponse[0];
// function from our example to call wallet_getCallsStatus
const response = await getCallsStatus(userOpHash);
if (response.status === "CONFIRMED") { // check when the tx is confirmed
return response;
}
```
## Common Known Issues
* "The method `wallet_grantPermissions` does not exist / is not available.’
* Please double check that your are using the right email adding +smart-sessions to end. Example: [test@gmail.com](mailto:test@gmail.com) -> [test+smart-sessions@gmail.com](mailto:test+smart-sessions@gmail.com)
* Don't forget to add funds to the smart wallet.
* Ethereum Sepolia isn’t currently working with Smart Sessions. Use Base Sepolia instead for now.